Concept/Goals
This small project was inspired by a number of things. First a model pack of Torchlight assets I was shown. The second was suggestions from people I greatly respect at GDC to do something very different than my thesis in order to show range. Finally, a desire to do a smaller quicker project, exploring a different style of gameplay, and re-using a finite number of assets and textures.
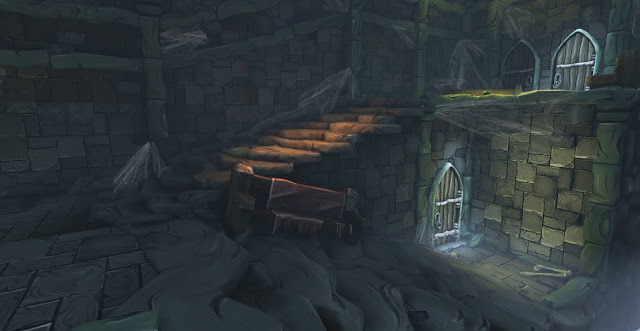
Having just finished my thesis I kept in mind what had been done well and what could be streamlined. Some of the key things were; getting assets in-engine fast, doing more up front concept work, and keeping the visual narrative small. For this project I kept the concept limited to, "a dungeon hallway with pools of light, and multiple exits."

Production/Techniques/Solutions
In keeping with doing something different than my thesis I did all hand painted textures. While Torchlight was an inspiration I was not trying to re-create them exactly. Some friends have remarked that this might be what Torchlight might look if it was remade.
 The model pack was helpful in creating stand alone assets, but it was not my guide for creating the environment. To do that I spent about a week working on different designs. Some included graveyards that went to ruined churches, forests with unearthed crypts, or temples inside cliffs surrounded by giant chasms. The themes evolved but kept expanding. "Project creep" had been an issue with my thesis so I kept culling these ideas. Eventually, through this process drawing I doddle a small hallway.
Concurrent with the concept phase I was picked out assets from the model pack that could be used no matter what final environment I chose. As figured these out I started to model and texture some of these pieces. This also let me organize my thoughts about the environment while moving forward.
The main tools for production were Maya and Mudbox. Zbrush was using used for a time, but it became apparent that Mudbox was better for this project. I used the standard hybrid approach of creating a base mesh in Maya, uv'ing it, and then moving into a sculpting program. While I enjoy sculpting in Zbrush these object did not get that much sculpting work. I felt with heavy normal maps may over power the painterly feel.

One reason I switched from Zbrush to Mudbox was to get the painterly feel. Polypaint in Zbrushs is great and having resolution independence certainly has advantages. Yet Mudbox's layer system out weighted that for this project. Having control over different portions of the texture while painting in real time speed up the work. When I attempted this with Zbrush it tended to cause me to repaint areas frequently. While masks, brush tweaking, and other tricks could limit this they slowed my work flow. The Zbrush process very analogous to real world painting, but the advantages of the computer is the flexibility and quickness; which Mudbox gave me.
Between the Wacom tablet and Mudbox the interaction did feel more like real-world feeling of painting. In a strange way I felt like I was painting model airplane from when I was a kid. The paint seemed to be applied much more evenly and accurately to the pressure I applied on the tablet than in Zbrush. Additionally, I found that the random settings for brushes increase productivity by letting me get subtle variation in the tones quicker. The color picker was helpful but the image color selector was probably the biggest help. It made it easy to get the pallet immediately. Combined with the "color history," I was able to re-use colors consistently over all assets. Finally, the color ring in Mudbox is much more fluid and easier to use than Zbrush's color swatches. I did miss being able to toggle between the two swatches in Zbrush.

After the hard lesson of not using UDK's grid I adhered to it closely for this project. This turned out to give me a number of advantages. The sketches I had done were great and a very base, but once it was in-engine the environment needed changes. The concept and paper exploration was great for getting the overall feel, but with the grid snapping I was able to explore other layouts quickly.
First, it was very easy to test things like doors, coffins, chandeliers locations. The real flexibility came with being able to explore variations. For example, having the walls built like crypts and coffins in them, adding another stair case in the corner, or making reference to a hallway that went away from the camera. It didn't take long to make these changes because all the elements snapped together correctly with little effort. It was also very apparent if the changes would confuse a player or not. Some of the quick combinations I came up with were to cluttered or made the space to confining. The final layout was a combination of my original sketches and the in-engine exploration.
First, it was very easy to test things like doors, coffins, chandeliers locations. The real flexibility came with being able to explore variations. For example, having the walls built like crypts and coffins in them, adding another stair case in the corner, or making reference to a hallway that went away from the camera. It didn't take long to make these changes because all the elements snapped together correctly with little effort. It was also very apparent if the changes would confuse a player or not. Some of the quick combinations I came up with were to cluttered or made the space to confining. The final layout was a combination of my original sketches and the in-engine exploration.

Final Thoughts
For such a short project I had a lot of fun with this one. The pipeline was similar to my thesis one too. So the exponential learning helped decrease the production time. The overall mood of the lighting is what I wanted, but I feel that the pools of light are to strong. A little more falloff might have helped. I do like the cool lighting on the doors and warm colors for the game space though. I find its a nice juxtaposition in my opinion. It was also pointed out that I keep doing dark spaces and I need to do some different styles of lighting.
I like how the assets came together. The hand painting was great but took a lot more time. In some spots I don't feel like it came through as well. Some of this is because of the shader work. I feel that's an area the need more improvement. UDK offers so much flexibility with the shaders.
This project will eventually be revisited in the future. There are still a good amount of assets to build from the model sheet and I know the idea can be expanded easily. In a long term goal it would be great to make a space that goes from outside, to inside a building, underground, and finishes in some large cavernous room. Feel free to contact me if you have questions or comments. I will do my best to respond.

No comments:
Post a Comment